Advanced Workshop - Datadog
In this workshop, we will incorperate the use of Verification Providers and Templates into the workhop. We will provide sample templates for Datadog, but you can modify our examples to use the APM tool of your choice if not already provided in our workshop.
If you are attending a live workshop with our team, you will be provided with an API key for a sandbox lab account
Ocean CD Entities
For this next section, we will modify our end-to-end YAML to make sure our Ocean CD entities tie into the k8s resources we created in the last section.
Let’s start by creating a local file on your machine and name it oceancd-entity.yaml
kind: "verificationprovider"
name: "datadog-vp"
clusterIds:
  - "datadog-workshop"
datadog:
  address: "https://api.datadoghq.com"
  apiKey: "**********"
  appKey: "************"

---

kind: verificationTemplate
name: oceancd-workshop-vt
metrics:
- name: My-first-metric
  interval: 5s
  count: 10
  successCondition: "result >= 0"
  failureLimit: 5
  provider:
    datadog:
      duration: "10s"
      query: "avg:system.cpu.user{*}"

---

kind: strategy
name: "oceancd-workshop"
canary:
  backgroundVerification:
    templateNames:
      - "oceancd-workshop-vt"
  steps:
    - name: "My-first-phase"
      setWeight: 20
      verification:
        templateNames:
          - "oceancd-workshop-vt"
    - name: "second-phase"
      setWeight: 40
      verification:
        templateNames:
          - "oceancd-workshop-vt"
    - name: "third-phase"
      setWeight: 80
      verification:
        templateNames:
          - "oceancd-workshop-vt"
      pause:
        duration: 1m

---

kind: RolloutSpec
name: "OceanCD-Rolloutspec-1"
spotDeployment:
  clusterId: "datadog-workshop"
  namespace: "oceancd-workshop"
  name: "nginx-deployment"
strategy:
  name: "oceancd-workshop"
traffic:
  canaryService: "rollouts-demo-canary"
  stableService: "rollouts-demo-stable"
failurePolicy:
  action: abort
Before applying this yaml file to the cluster, we need to verify two items:
-
ClusterIds- This is referenced for both Verification Provider and Rollout Spec. If the name of the cluster you created is not “oceancd-demo”, then you will need to update this.
-
Verification Provider - Update the API key and APP Keys with your datadog information.
Run the command:
oceancd apply -f oceancd-entity.yaml
Trigger a Rollout
Now that we have created all of the k8s resources and Ocean CD entities, let’s test it! Go back to your first YAML file that was created and update the image version to the following:
image: public.ecr.aws/nginx/nginx:1.23
Now save that file and apply.
kubectl apply -f k8s-e2e.yaml
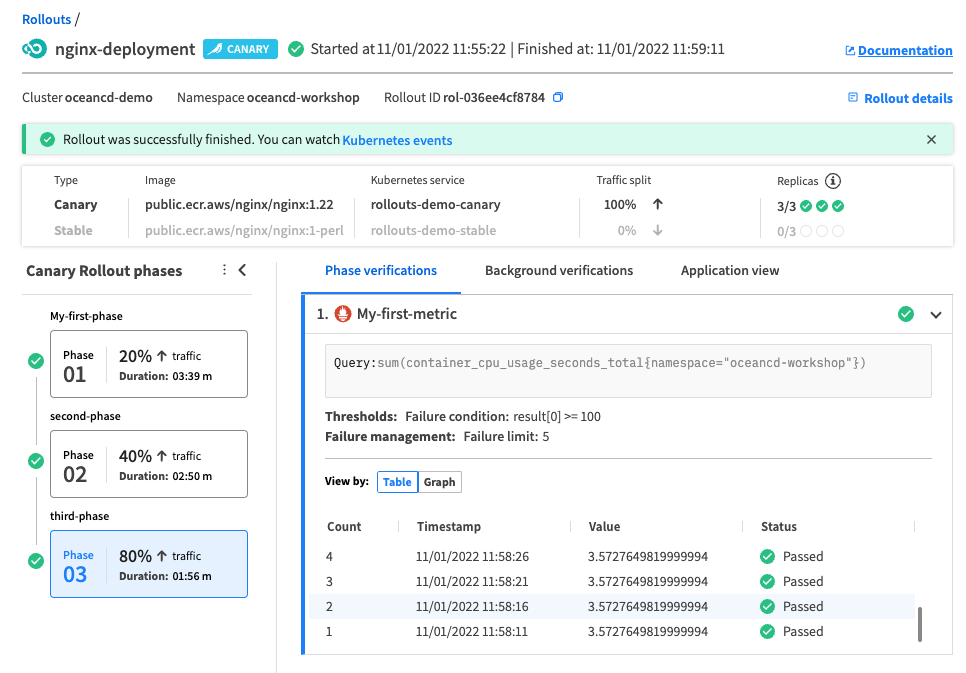
This will trigger your first rollout. You should now see all the pieces coming together:
- Production Ready Canary Deployment
- Verification Driven Rollouts- Tied into your actual datadog metrics
- Spot Deployment
- Automated Rollbacks in the event you encounter a failure
Now let’s make some changes to the underlying strategy. Change your Ocean CD strategy within the oceancd-entity.yaml to the following:
kind: Strategy
name: "oceancd-workshop"
canary:
  backgroundVerification:
    templateNames:
      - "oceancd-workshop-vt"
  steps:
    - name: "My-first-phase"
      setWeight: 20
      verification:
        templateNames:
          - "oceancd-workshop-vt"
      pause:
        duration:
    - name: "second-phase"
      setWeight: 40
      verification:
        templateNames:
          - "oceancd-workshop-vt"
    - name: "third-phase"
      setWeight: 80
      verification:
        templateNames:
          - "oceancd-workshop-vt"
      pause:
        duration: 1m
This is inserting an unspecified pause duration to the strategy within Ocean CD. This means before completing the first phase of the rollout, it will require a manual approval to proceed to the next phase. This gives you the ability to simulate the scenario of a Sr. Developer needing to manually promote a deployment to the next phase and is a commonly asked for feature amongst our customers.
- Run the command:
oceancd apply -f oceancd-entity.yaml
Trigger a Rollout
Now that we have modified the strategy, let’s test it. Go back to k8s-e2e.yaml file that was created and update the image version to the following:
image: public.ecr.aws/nginx/nginx:1-perl
Now save that file and apply.
kubectl apply -f k8s-e2e.yaml
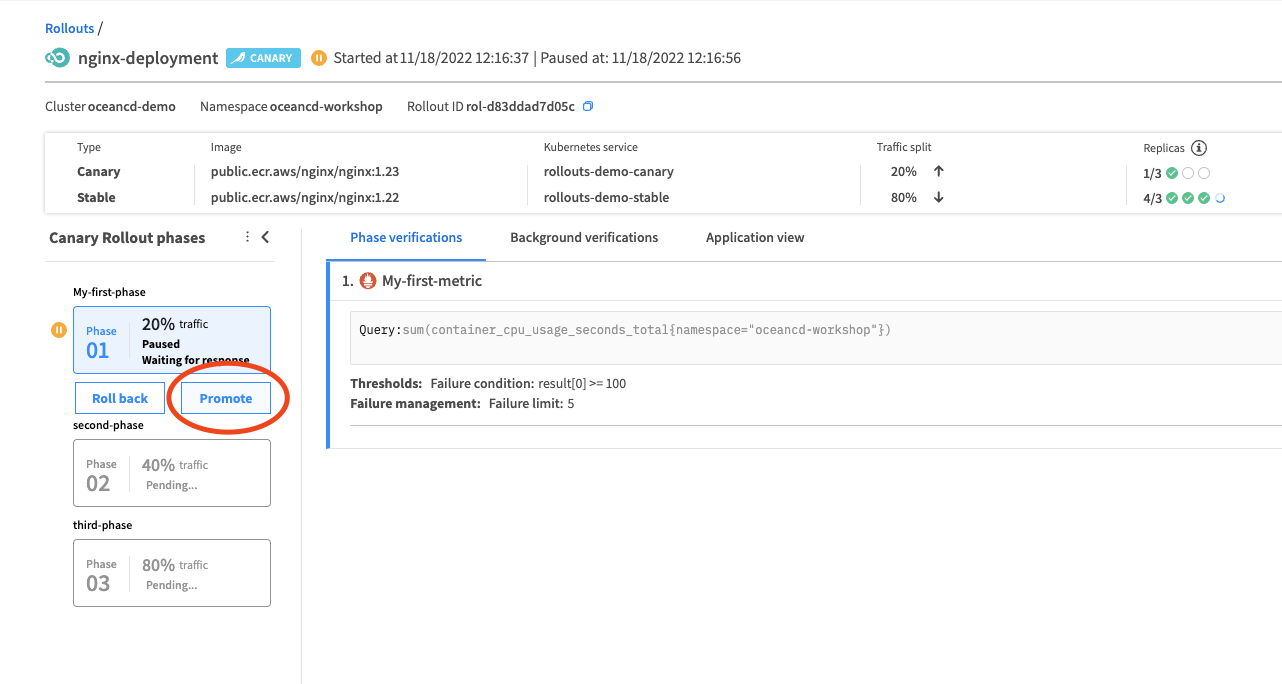
Now if we review the rollout within the Ocean CD console, we will see the UI is prompting me to manually promote this rollout to the next phase. Once we click promote, it will follow the same strategy as we utilized prior.
Conclusion
This concludes the content for the advanced workshop, we encourage you to continue making changes to your Ocean CD entities and continue testing the capabilities of Ocean CD. Some additional scenarios to test within Ocean CD:
- Changing datadog queries, incorperating arguments into your query
- Change Strategy - Include manual approval processes at different phases
- Create another Spot Deployment - Reuse the same strategy
- Make a change that will intentionally fail your rollout and see the automated rollback
Windows Users
At this time, the Ocean CD CLI is only supported on MAC and Linux operating systems. If you are a Windows users, we are working to provide these same templates in JSON format and you can easily run them in Postman by following the link below:
