VNG Lab
Using nodeSelectors
Let’s deploy our workload, in our examples we will a deploy simple nginx Pod just to simulate the behaviour of Ocean alongside the Kubernetes Scheduler.
Create a file vng-example.yaml with the following content
apiVersion: apps/v1
kind: Deployment
metadata:
  name: example-1
spec:
  selector:
    matchLabels:
      app: nginx
  replicas: 1
  template:
    metadata:
      labels:
        app: nginx
    spec:
      containers:
      - name: nginx-dev
        image: nginx
        resources:
          requests:
            memory: "100Mi"
            cpu: "256m"
      nodeSelector:
        env: ocean-workshop
        example: "1"
Apply the file using kubectl, run kubectl apply -f vng-example.yaml
➜  kubectl apply -f vng-example.yaml
deployment.apps/example-1 created
List the pods,nodes from the cluster, you’ll be able to see the created Pod in a Pending state, run kubectl get pods,nodes
➜  kubectl get pods,nodes
NAME                             READY   STATUS    RESTARTS   AGE
pod/example-1-7f8b5549bb-4k8rp   0/1     Pending   0          14s

NAME                                               STATUS   ROLES    AGE   VERSION
node/ip-192-168-64-43.us-west-2.compute.internal   Ready    <none>   51m   v1.19.6-eks-49a6c0
Following a couple of minutes, run kubectl get pods,nodes -o wide, we will see that a new node joined our cluster and that the Pod is being created/running on top of it
➜  kubectl get pods,nodes -o wide                                                                                                                                                                                                            21/06/14 | 12:23:41
NAME                             READY   STATUS              RESTARTS   AGE   IP       NODE                                           NOMINATED NODE   READINESS GATES
pod/example-1-7f8b5549bb-4k8rp   0/1     ContainerCreating   0          83s   <none>   ip-192-168-46-105.us-west-2.compute.internal   <none>           <none>

NAME                                                STATUS   ROLES    AGE   VERSION              INTERNAL-IP      EXTERNAL-IP      OS-IMAGE         KERNEL-VERSION                CONTAINER-RUNTIME
node/ip-192-168-46-105.us-west-2.compute.internal   Ready    <none>   45s   v1.19.6-eks-49a6c0   192.168.46.105   35.160.241.120   Amazon Linux 2   5.4.117-58.216.amzn2.x86_64   docker://19.3.13
node/ip-192-168-64-43.us-west-2.compute.internal    Ready    <none>   52m   v1.19.6-eks-49a6c0   192.168.64.43    54.202.238.83    Amazon Linux 2   5.4.117-58.216.amzn2.x86_64   docker://19.3.13
Describe the node to verify the nodeLabels are assigned to it, run kubectl describe <node-name>
➜ kubectl describe node ip-192-168-46-105.us-west-2.compute.internal                                                                                                                                                                        21/06/14 | 12:26:10
Name:               ip-192-168-46-105.us-west-2.compute.internal
Roles:              <none>
Labels:             alpha.eksctl.io/cluster-name=eksctl-demo
                    alpha.eksctl.io/instance-id=i-093742eb4f412401a
                    alpha.eksctl.io/nodegroup-name=ocean
                    beta.kubernetes.io/arch=amd64
                    beta.kubernetes.io/instance-type=c4.large
                    beta.kubernetes.io/os=linux
                    env=ocean-workshop
                    example=1
                    failure-domain.beta.kubernetes.io/region=us-west-2
                    failure-domain.beta.kubernetes.io/zone=us-west-2b
                    kubernetes.io/arch=amd64
                    kubernetes.io/hostname=ip-192-168-46-105.us-west-2.compute.internal
                    kubernetes.io/os=linux
                    node-lifecycle=spot
                    node.kubernetes.io/instance-type=c4.large
                    spotinst.io/node-lifecycle=spot
                    topology.kubernetes.io/region=us-west-2
                    topology.kubernetes.io/zone=us-west-2b
In addition to node labels you define, nodes come pre-populated with a standard set of labels. See Well-Known Labels, Annotations and Taints for a list of these.
Ocean expands the built in Kubernetes node-labels functionality with some proprietary labels supported by Ocean. See Labels & Taints for further details.
We are now able to specify when we want to force a specific workload to run on machines of the example-1 VNG, in the current state, Pods with no specific constraints (e.g not directed toward specific type of nodes) might be placed on nodes from the example-1 VNG, in order to prevent that we will also need to assign a Taint to the VNG, the Pods that we want to run on the tainted VNG should Tolerate that Taint.
Using Taints/Tolerations
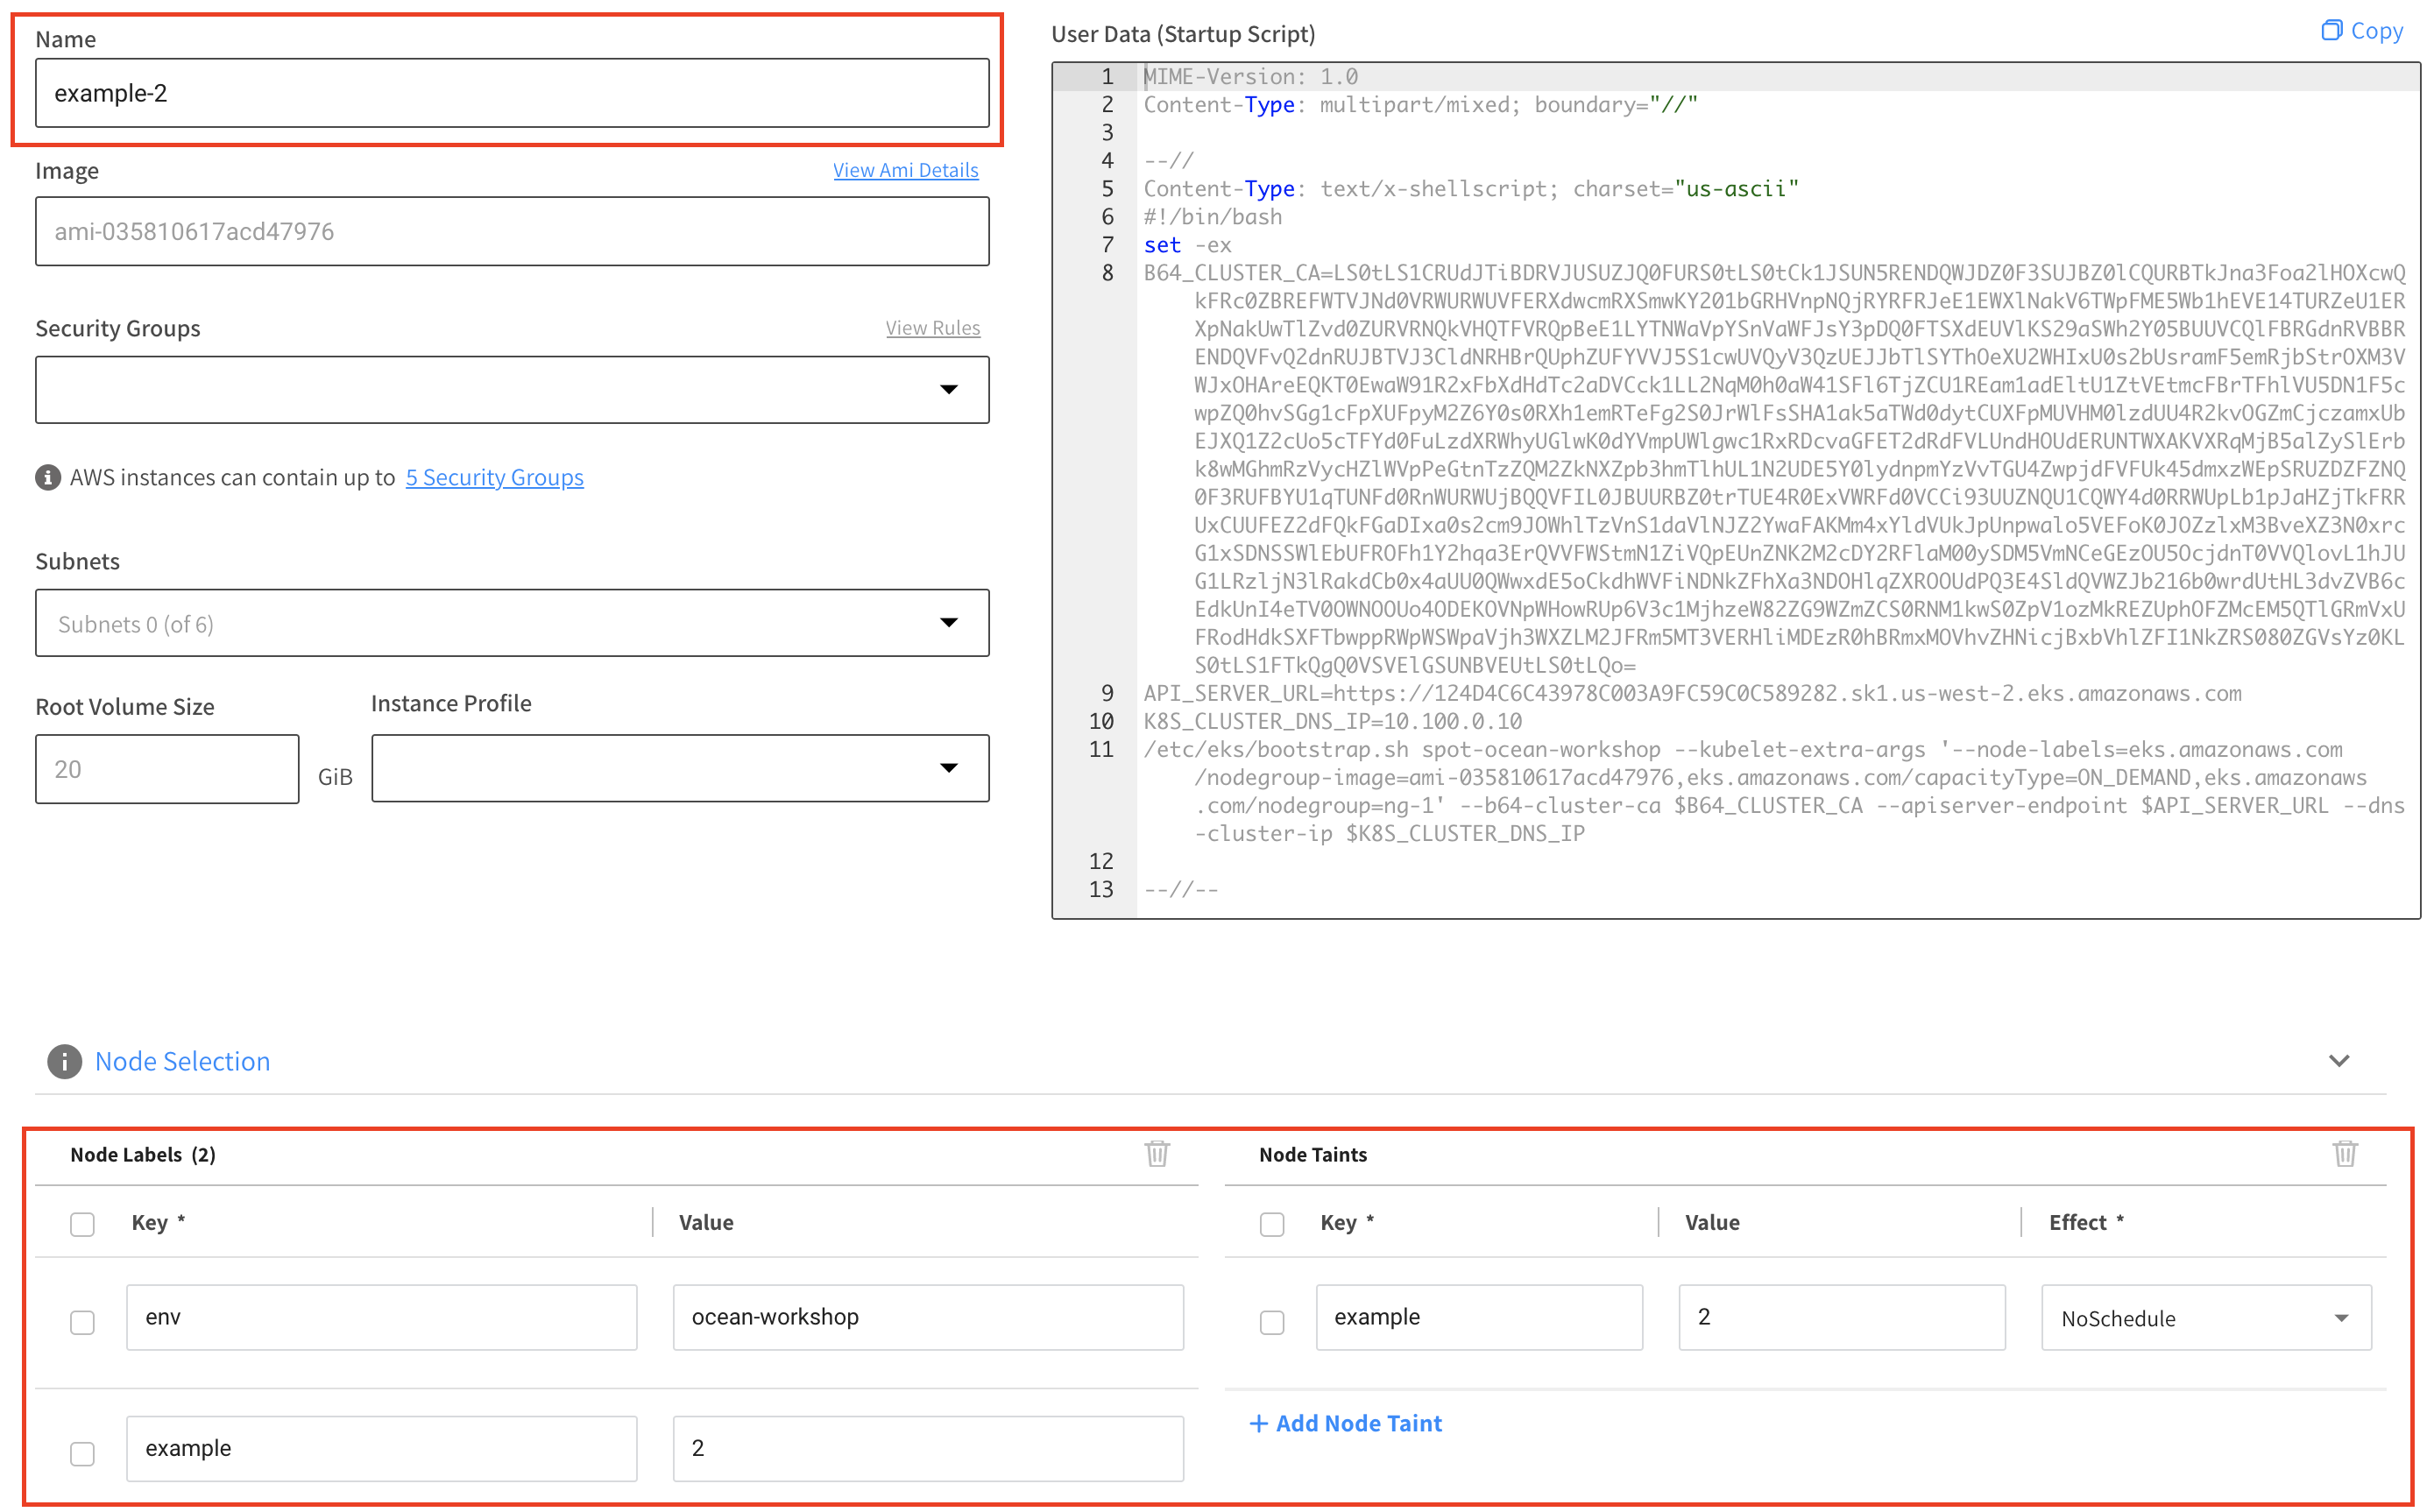
In order to demonstrate that, let’s add a new VNG, follow the same process but specify the following configurations - in the Name specify example-2, in the Node Selection section specify:
Node Labels (formatted as key: value)
- env: ocean-workshop
- example: 2
Node Taints
- Key: example
Value: 2
Effect: NoSchedule

Click the save button on the bottom of the page
Create a file vng-example-2.yaml file with the following content:
apiVersion: apps/v1
kind: Deployment
metadata:
  name: example-2-1
spec:
  selector:
    matchLabels:
      app: nginx
  replicas: 1
  template:
    metadata:
      labels:
        app: nginx
    spec:
      containers:
      - name: nginx-dev
        image: nginx
        resources:
          requests:
            memory: "100Mi"
            cpu: "256m"
      nodeSelector:
        env: ocean-workshop
        example: "2"
      tolerations:
      - key: "example"
        operator: "Equal"
        value: "2"
        effect: "NoSchedule"
---
apiVersion: apps/v1
kind: Deployment
metadata:
  name: example-2-2
spec:
  selector:
    matchLabels:
      app: nginx
  replicas: 1
  template:
    metadata:
      labels:
        app: nginx
    spec:
      containers:
      - name: nginx-dev
        image: nginx
        resources:
          requests:
            memory: "100Mi"
            cpu: "256m"
      nodeSelector:
        env: ocean-workshop
        example: "2"
While both Pods require our nodeLabels only one of them tolerates the node taints, let’s view it’s effect:
Run kubectl apply -f vng-example-2.yaml
➜  kubectl apply -f vng-example-2.yaml
deployment.apps/example-2-1 created
deployment.apps/example-2-2 created
We will now see that both our Pods are pending, run kubectl get pods,nodes
➜ kubectl get pods,nodes
NAME                               READY   STATUS    RESTARTS   AGE
pod/example-1-7f8b5549bb-xnsfq     1/1     Running   0          48m
pod/example-2-1-64d9d4877d-rv2pg   0/1     Pending   0          39s
pod/example-2-2-7d55b5b8cf-dfkpw   0/1     Pending   0          37s

NAME                                                STATUS   ROLES    AGE    VERSION
node/ip-192-168-46-105.us-west-2.compute.internal   Ready    <none>   132m   v1.19.6-eks-49a6c0
A couple of minutes later Ocean will scale up a new machine to satisfy the supported Pod, we will see that only one of the Pods (example-2-1) will be scheduled while the other wont since it does not tolerate the nodes taint.
Run kubectl get pods,nodes -o wide
➜  kubectl get pods,nodes -o wide
NAME                               READY   STATUS    RESTARTS   AGE     IP               NODE                                           NOMINATED NODE   READINESS GATES
pod/example-1-7f8b5549bb-xnsfq     1/1     Running   0          50m     192.168.48.21    ip-192-168-46-105.us-west-2.compute.internal   <none>           <none>
pod/example-2-1-64d9d4877d-rv2pg   1/1     Running   0          2m26s   192.168.24.234   ip-192-168-24-193.us-west-2.compute.internal   <none>           <none>
pod/example-2-2-7d55b5b8cf-dfkpw   0/1     Pending   0          2m24s   <none>           <none>                                         <none>           <none>

NAME                                                STATUS   ROLES    AGE    VERSION              INTERNAL-IP      EXTERNAL-IP      OS-IMAGE         KERNEL-VERSION                CONTAINER-RUNTIME
node/ip-192-168-24-193.us-west-2.compute.internal   Ready    <none>   87s    v1.19.6-eks-49a6c0   192.168.24.193   54.149.39.228    Amazon Linux 2   5.4.117-58.216.amzn2.x86_64   docker://19.3.13
node/ip-192-168-46-105.us-west-2.compute.internal   Ready    <none>   134m   v1.19.6-eks-49a6c0   192.168.46.105   35.160.241.120   Amazon Linux 2   5.4.117-58.216.amzn2.x86_64   docker://19.3.13
Run kubectl describe <pod-name>
Under the Events section you’ll see that the reason for the Pod not being scheduled is because there is a node with a taint that the pod did not tolerate
➜  kubectl describe pod/example-2-2-7d55b5b8cf-dfkpw
Name:           example-2-2-7d55b5b8cf-dfkpw
Namespace:      default
Priority:       0
Node:           <none>
Labels:         app=nginx
                pod-template-hash=7d55b5b8cf
Annotations:    kubernetes.io/psp: eks.privileged
Status:         Pending
IP:
IPs:            <none>
Controlled By:  ReplicaSet/example-2-2-7d55b5b8cf
Containers:
  nginx-dev:
    Image:      nginx
    Port:       <none>
    Host Port:  <none>
    Requests:
      cpu:        256m
      memory:     100Mi
    Environment:  <none>
    Mounts:
      /var/run/secrets/kubernetes.io/serviceaccount from default-token-wlpsv (ro)
Conditions:
  Type           Status
  PodScheduled   False
Volumes:
  default-token-wlpsv:
    Type:        Secret (a volume populated by a Secret)
    SecretName:  default-token-wlpsv
    Optional:    false
QoS Class:       Burstable
Node-Selectors:  env=ocean-workshop
                 example=2
Tolerations:     node.kubernetes.io/not-ready:NoExecute op=Exists for 300s
                 node.kubernetes.io/unreachable:NoExecute op=Exists for 300s
Events:
  Type     Reason            Age                    From               Message
  ----     ------            ----                   ----               -------
  Warning  FailedScheduling  5m59s (x4 over 6m46s)  default-scheduler  0/1 nodes are available: 1 node(s) didn't match node selector.
  Warning  FailedScheduling  5m47s (x2 over 5m47s)  default-scheduler  0/2 nodes are available: 2 node(s) didn't match node selector.
  Warning  FailedScheduling  31s (x7 over 5m37s)    default-scheduler  0/2 nodes are available: 1 node(s) didn't match node selector, 1 node(s) had taint {example: 2}, that the pod didn't tolerate.